After you create a new workspace, you can perform other actions which help you to perform better in your daily tasks.
Invite users to the workspace
You can invite other users to your workspace. You can invite users from your team, or from your organization, or any other user with a valid email ID. An invitation link is sent to the email ID provided and using that link the user can login and view the workspace.
To invite users to the workspace, follow the steps:
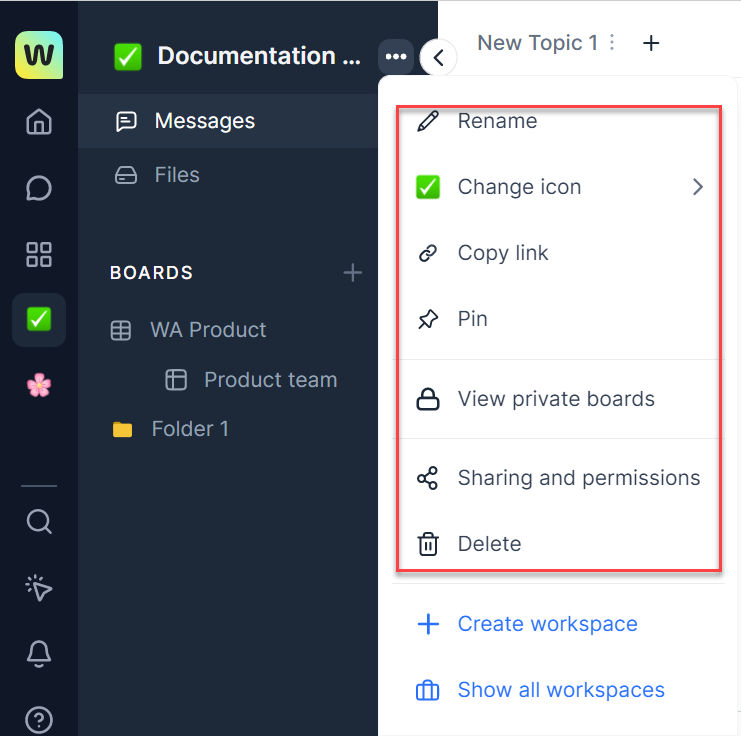
- Click the three dotted lines icon corresponding to the <workspace name>in the left panel of the workspace landing page. A pop-up with the list of options is displayed.
- Click Sharing and permissions. The Sharing and permissions dialog is displayed.
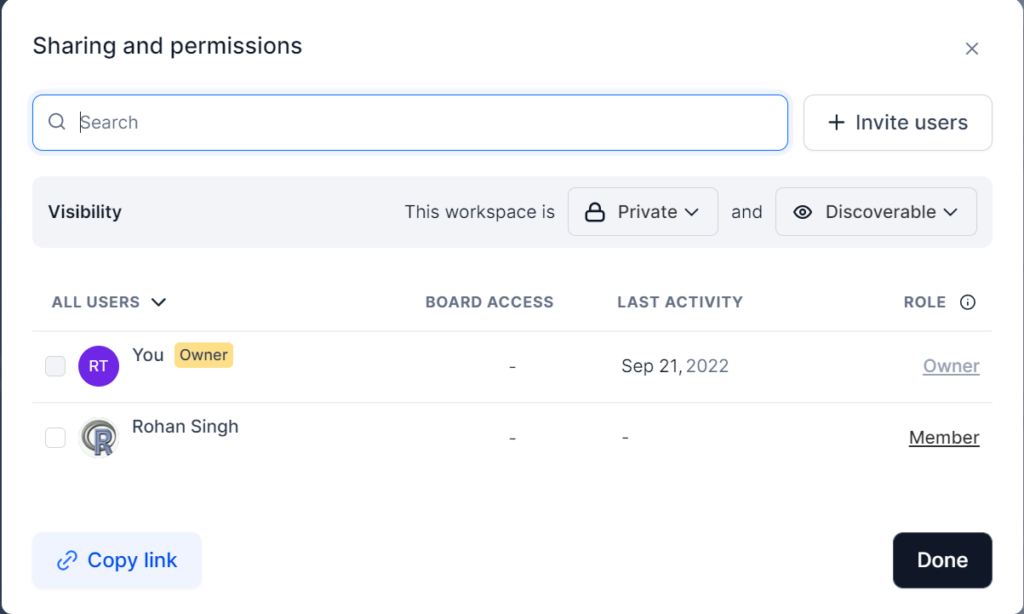
- Click the + Invite users button on the Sharing and permissions page. The Invite users dialog is displayed.
- Enter the name of the member you want to add and invite in the Type and add field.
- Select the role you want to assign to the new member from the drop-down and click Invite.
The added members receive an email which can be used to login to Workspace.ai and view your workspace.
Manage a workspace
You can manage a workspace and make any modifications if required. You can modify the visibility and discoverability of your workspace, search members to add and give permissions.
To manage a workspace, follow the steps:
- Click the three dotted lines icon corresponding to the <workspace name> in the left panel of the workspace landing page. A pop-up with the list of options is displayed.
- Click Sharing and permissions. The Sharing and permissions dialog is displayed.
- Click the <Role> link corresponding to the name of the user. For example, in the preceding image the permission to the user is “Member”. Select the permission level you want to set from the pop-up displayed. Any one of the following permissions can be set:
Admin: You can have full access to invite other members, change access of the members, and modify preferences of the workspace.
Member: You can invite other members and collaborate on boards.
Guest: You can invite users outside the workspace. - Click the Visibility and Discoverable drop-down to change your preferences.
- Click Done to save all the changes.
Pin a workspace
You can pin a workspace and the pinned workspaces are displayed with a pin icon on the Workspace page to set it as a starred workspace for your reference.
To pin a workspace, follow these steps:
- Click the three dotted lines icon corresponding to the <workspace name> in the left panel of the workspace landing page. A pop-up with the list of options is displayed.
- Click Pin from the list of options.
Your workspace is now pinned, and you can see the pinned mark next to the workspace name in the list of workspaces on the workspaces page.
Copy workspace link to share
You can get a link to a workspace and share it with other users. The other users can use the link to sign-up to Workspace.ai and use your workspace.
To copy a workspace link, follow these steps:
- Click the three dotted lines icon corresponding to the <workspace name> in the left panel of the workspace landing page. A pop-up with the list of options is displayed.
- Click Copy Link. The workspace link is copied and can be shared with other users.
Delete a workspace
You can delete a workspace if you no longer require it.
To delete a workspace, follow these steps:
- Click the three dotted lines icon corresponding to the <workspace name> in the left panel of the workspace landing page. A pop-up with the list of options is displayed.
- Click Delete. A confirmation message is displayed. Click Delete to confirm deletion.